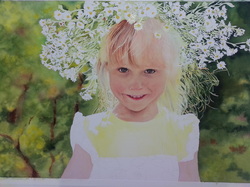
This child is back lit and poses a unique challenge for painting her baby, flyaway hair. Previously, I used masking fluid and a rigger brush to mask the tiny hairs that fly out and are lit from behind on a darker background. When the background was dry I removed the fluid and laid in a pale, pale wash of gamboge, azo yellow, and a lavender made of purple magenta, manganese blue hue and a touch of gamboge to tone it down a bit. I had also applied masking to the light hairs that lay across the front of her head so I wouldn't have to paint around them. Her hair was fun to paint because there are so many shades of blonde. I began with the lightest, stroking in azo yellow (aureolin) and in places, gamboge, progressively adding darker tans and browns when the lighter colors dried. My browns are almost exclusively varying combinations of quinacridone rust (or quin.burnt orange) and ultramarine blue. For more golden colors, I add a bit of gamboge.

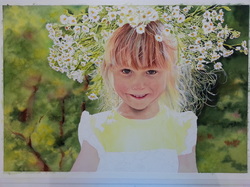
Basically, I just continued to model the hair, sometimes using a #4 synthetic brush, sometimes a rigger. Some of the colors I used were pinks, which next to the yellows gave an apricot highlight, and some tinges of green and blue to reflect the surrounding greenery. Adding more darks to the top of her head under the daisies and in several places helped to "push" the hair underneath the top, lighter hairs. This is a fun part, because the painting starts to paint itself. As you stoke color and it begins to dry, the path of the hair sort of just shows up and tells you where to add more darks, or highlights. In this back lit scene, I was careful to keep the outside edges of her hair very light and leave a great deal of the white paper.

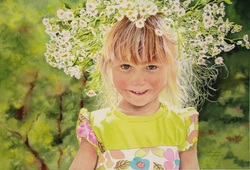
To finish the back lighting of her hair, I used a rigger brush and a diluted solution of Arches Liquid Paper and dry brushed the fine hairs that fly away into the light. The diluted substance lets some of the background show through and gives the hair a hazy, soft look. The mask was removed from the hairs laying across her crown and the edges softened and some color applied as needed.
The difference in color from this and the previous photo are due to the fact that I take my "as I go" photos with my phone, but the finished photo is taken with a camera and then adjusted on my computer to be as close to the original painting as possible.
Again, if this tutorial helped you, or gave you some ideas, I'd love to hear from you.